
TouchDAW is a full-featured digital audio workstation (DAW) controller featuring a MIDI mixer and other advanced MIDI controllers. It allows you to remote control popular DAW software and can act as a replacement for expensive hardware control surfaces. It runs on Android devices, and in this tutorial I’ll show you how to set it up to work with Ableton Live 9 running on Windows 10.
Advanced MIDI controller
The mixer component is essentially a Mackie controller that connects to your DAW over WiFi, USB (via ADB), or Bluetooth. The mixer interface includes faders, transport and channel controls including mute, pan, sends, record arm etc. TouchDAW also features a range of advanced MIDI controllers including Multi-touch Launchpads, X/Y controller pads, Kaossilator, multi-touch keyboard, and the ability to manipulate MIDI data using your phones sensors. It’s very affordable, feature rich, and stable application.
Digital Audio Workstation Support
TouchDaw can be installed on Android tablets and phones from the Google Play store. It supports Cubase, Ableton Live, Logic, Pro Tools, Sonar, FL Studio, REAPER, Reason, Studio One, Samplitude, SAWStudio Digital Performer, Sony Vegas, Acid, Tracktion, and Bitwig studio. I’ll concentrate on showing you how to get it working with Ableton Live 9.
Advanced MIDI controller
I originally purchased TouchDAW as it was the only Android based MIDI controller that could work over USB. This would ensure my tablet would never run out of power during a live performance, and I didn’t have to worry about the dreaded DPC latency issues on Windows. I found Windows XP, 7, and 8 would introduce all sorts of horrible glitches, pops and crackles to the audio output when there was any network activity. In the past Windows users disabled all network adapters to stop this from occurring when running a DAW, but this issue appears to be rectified in Windows 10.
I was considering writing a tutorial about TouchDAW using USB via ADB. I can assure you it’s a frustrating experience as ADB drivers can be a lot of hassle. USB support, and HQ audio on Android is seriously lacking, I now know why a lot of people opted to use iPADs. But I digress.
Connecting TouchDAW to Ableton 9 using WiFi
1. Using your Android device, download and install TouchDAW from the Google Play store. There is a limited functionality TouchDAW available for free. This will allow you to run a few tests before you purchase the full version https://play.google.com/store/search?q=touchdaw
2. Download and install MidiHub a.k.a mnet from the TouchDAW Website on your Windows 10 machine http://www.humatic.de/htools/mnet/download.php You will receive some Windows prompts about Firewall permissions, please ensure MidiHub is allowed to communicate through the firewall, otherwise MidiHub will not be able to connect to your Android device.
3. Ensure your tablet or phone is connected to the same wireless network as your Windows 10 machine. I will discuss network latency, and Windows Ad-Hoc networking later.
Ableton Live 9 Control surfaces setup
TouchDAW has 2 MIDI channels. 1 channel is for the MIDI Mixer, the 2nd channel is for the Advanced MIDI controllers.
4. Open Ableton Live. Then start MidiHub. In Ableton click on Preferences and navigate to the MIDI settings.

In the Control surface settings select MackieControl. In the Input and Output boxes select MIDIHub Port 1. This setting will ensure bidirectional communication between Ableton 9 and TouchDAW. The TouchDAW mixer is acting as a Mackie compatible control surface.
Ableton Live 9 MIDI input and output settings

5. In the same MIDI preferences window, under MIDI ports input section locate Input: MIDIHub Port 2 and ensure Remote is set to On. This setting allows remote MIDI input from TouchDAW to Ableton.

6. In the same MIDI preferences window, under MIDI ports output section locate Ouput: MIDIHub Port 2 and ensure Remote is set to On. This setting allows remote MIDI output from Ableton to TouchDAW.
NB* There is no need to turn on Track, or Sync settings on the MIDI ports input or Output. From my understanding this will increase CPU usage and is of no use with this application.
TouchDAW routing setup

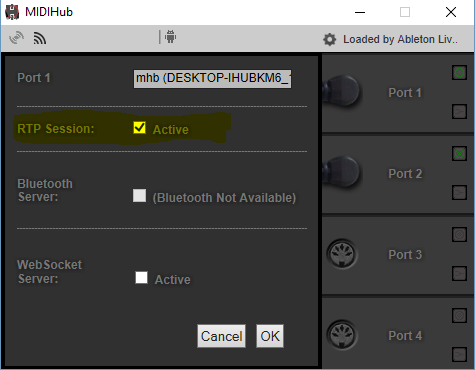
7. In step 1 you should have started TouchDAW. Now I will show you how to correctly configure TouchDAW routing. Don’t worry, Ableton and TouchDAW will remember all of these settings. In TouchDAW you should see a notice in the top right hand corner Loaded by Ableton Live. I will discuss how to connect the virtual wires in a moment.
NB* If you see something like Loaded by Lemur or Loaded by Novation Automap then you’ll need to shutdown these daemons. Then shutdown TouchDAW and Ableton. You must start Ableton, then start TouchDAW. You cannot allow another application to connect to TouchDAW before Ableton does. I know this might sound a bit annoying, and although I use Lemur, Automap, and a LeapMotion controller, I configure these not to autostart. Everything seems to want to autostart in Windows these days, I prefer to save CPU and RAM and start them manually when I need to use them.
8. On your Android tablet or phone, open the TouchDAW settings. We will need to configure it to use MIDI over WiFi. Actually we will be using RTP. RTP stands for Real-time Transport Protocol. It is a network protocol for delivering audio and video over IP networks. Don’t worry, it sounds complicated but we don’t need to understand how RTP operates, and TouchDAW will remember all of our settings.

The DAW controller setting is where we configure the MIDI port for the Mixer. The MIDI Utilities setting is where we configure the MIDI port for the other MIDI controllers such as the XY pads, LaunchPads etc. This sounds somewhat complicated, it’s not and it’s very flexible. It allows you to control a DAW on 1 computer, and control a DAW on a 2nd computer using the launchpads, XY pads etc. I don’t use this function but I think it’s a great feature.
9. Click on DAW controller. Then click on MIDI Connection. Select WIFI. Then select RTP. Then select Local Session.

10. Redo these selections for MIDI Utilities. Great, now you have full configured TouchDAW on your Android device.
11. Return to your TouchDAW on your computer. You should see two RTP/Multicast ports on the left hand pane. If you cannot see these ports, check that Windows and TouchDAW is on the same Wireless network. Also check your Firewall is not blocking TouchDAW.
Connect the first RTP/Multicast port to Port 1 on the right hand side pane. You can do this by clicking on the connector and dragging it to the connector on the right. Essentially what you’re doing is connecting the DAW controller (i.e the TouchDAW Mixer) from step 8 to Port 1.
If you make a mistake, to undo a connection (and believe me this took a long time to figure out as it is not documented in the manual) Double click on each connector of the virtual cable and it will be removed.
Now connect the extra MIDI Utilities e.g XY, Launchpads, by connecting the second RTP/Multicast port to Port 2.
12. One last configuration change, On Port 1 and Port 2 in MIDIHub click on the the small square box in the top right of each port box. Select RTP Session and set it to be Active.
13. Ableton and TouchDAW should be fully synchronized. Time signal, sends, faders etc should all be fully bidirectional. On the main MIDIHub app window you will notice the left hand triangle light up red if Ableton is sending sync info. If you move a fader on the TouchDAW mixer you will see the right hand triangle light up red. You should see a corresponding MIDI activity indicator in the top right corner of Ableton Live.
We’ve finally made it, congratulations! Please leave a comment or ask a question below.
A quick note about network Latency
I’ve noticed a small amount of latency can be introduced with this setup if your WIFI router is very far away from both devices. For performing live, or overcoming any latency issues you should start an Ad-Hoc Wireless network on your Windows 10 laptop. However this is beyond the scope of this tutorial. I avoid the need for Ad-hoc networks by using my phone as a Wireless hotspot during live performances. Just make sure you phone is set to silent.
If you found this tutorial useful please consider watching my music videos or purchasing some of my music. http://invisibleagent.com/music/artists/warren-daly Just look at the links below to find more engaging music and videos. Thanks ~Warren


Leave a Reply